Observations from the Opposing Force, Part II: Movement-to-Contact Lessons-Learned from National Training Center Rotation 12-05


The National Training Center (NTC) hosted its first decisive-action rotation in March 2012. The first mission during the rotation’s force-on-force segment was a movement-to-contact between 3rd Armored Brigade Combat Team (ABCT), 3rd Infantry Division, and 11th Armored Cavalry Regiment (ACR) (Blackhorse). Blackhorse defeated 3/3 Infantry during the movement-to-contact in the Central Corridor by destroying 2nd Battalion, 69th Armored Regiment (AR), in the vicinity of the Racetrack and by fixing 1st Battalion, 15th Infantry Regiment, in the vicinity of Alpha/Bravo Pass.
At the time of the rotation, I commanded D Company, 1/11 ACR. My intent with this article is to provide troop-level commanders with planning considerations based on my experience in planning and executing a movement-to-contact at NTC.
The movement-to-contact afforded Blackhorse, 3/3 and the NTC’s Operations Group many valuable lessons. In retrospect, I identified four factors that contributed to D Company’s success in executing the movement-to-contact:
- First, we operated with an effective mission-command structure that fostered disciplined initiative and risk-taking;
- Second, we effectively organized for combat;
- Third, we developed an effective method of ammunition resupply that allowed the company to maintain continuous pressure and tempo throughout the battle, allowing us to operate within 2-69 AR’s decision-making cycle; and
- Lastly, we used our intimate knowledge of the terrain to trade security for speed, allowing us to quickly seize key terrain.
Blackhorse and Sledgehammer – movement-to-contact in the box
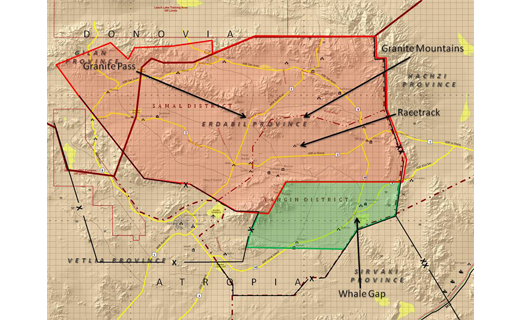
Blackhorse attacked along two axes of approach – one north of the Granite Mountains with C/1/11 ACR fixing 1-15 Infantry and 2-69 AR in the Central Corridor. G/2/11 ACR, the decisive operation (DO), attacked south of East Range Road to seize key terrain (Hill 760). D/1/11 ACR attacked between the Granite Mountains and East Range Road to seize key terrain (the Racetrack) to prevent enemy forces massing on the regiment’s DO. Blackhorse had two troops (A/1/11 ACR and H/2/11 ACR) in follow-and-support roles several kilometers behind the main body.
Upon crossing the line of departure, the lead elements of Blackhorse (D/1/11 ACR and G/2/11 ACR) traveled rapidly from their attack positions west of the Donovia/Atropia international boundary toward the eastern side of the training area to seize their objectives. Both troops’ rapid advance was a direct result of the regiment’s reconnaissance effort and their knowledge of the terrain.
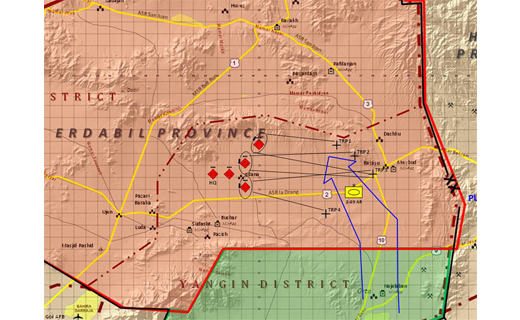
At Barstow Road, D Company and G Troop transitioned from traveling to traveling overwatch. At this point, we received reports that enemy tanks and Bradleys were about 10,000 meters east to southeast of the Racetrack. G Troop pushed forward to Hill 780, stopping some 6,000 meters short of its original objective at Hill 760. D Company bounded forward and occupied hasty defensive positions along the intervisibility lines around the Racetrack. In proceeding to the Racetrack, D Company was 3,000 meters forward of G Troop, pushing us just outside direct-fire range of G Troop. Because of this, I coordinated with G Troop and changed D Company’s target-reference points to cover area that had been previously assigned to G Troop.
The 3/3 Infantry led the attack with 3-1 Cavalry. Upon identifying Blackhorse, 3-1 Cavalry conducted a passage of 2-69 AR and 1-15 Infantry. The 1-15 Infantry attacked north of the Granite Mountains and attempted to penetrate into Echo Valley. During the intelligence-preparation-of-the-battlefield process, Troop C determined the most likely path for 1-15 Infantry would be through Alpha and Bravo passes. Troop C used this information to develop its course of action (CoA), which had the troop rapidly advance through Echo Valley to pin 1-15 Infantry against the mountain walls as they attempted to advance through the passes. In fixing 1-15 Infantry north of the Granite Mountains, Troop C thwarted 3/3 Infantry’s northernmost element, which put all pressure for mission success on 2-69 AR in the Central Corridor.
The 2-69 AR advanced along Flagpole Main Supply Route, passing through Whale Gap. Shortly after passing through Whale Gap, 2-69 split its formation and attacked into the Central Corridor along two axes – one rounding the Snow Cone and north of East Range Road, the other cresting Hill 760 and south of East Range Road. With G Troop stalled at Hill 780, and D Company occupying a hasty defense at the Racetrack, the company made initial contact with 2-69 AR as the lead tanks crested a ridge 2,500 meters to the company’s front.
For the next hour, D Company found itself locked in a battle of attrition as 2-69 attempted to use its size to overwhelm the company. D Company made effective use of intervisibility lines, crew drills and ammunition management to destroy 2-69. By the end of the battle, D Company destroyed 25 M-1 tanks, 36 Bradley Fighting Vehicles, three humvees, one OH-58 and various support vehicles from 2-69, rending the battalion combat-ineffective. The destruction of 2-69 AR, coupled with the fixing of 1-15 Infantry, stalled 3/3 Infantry’s attack.
Mission command and starting with why
Perhaps the most imperative aspects of D Company’s success can be attributed to the exercise of mission command at all levels within the Blackhorse Regiment. The Army defines mission command as “the exercise of authority and direction by the commander using mission orders to enable disciplined initiative within the commander’s intent to empower agile and adaptive leaders in the conduct of unified land operations.”1 At the heart of exercising mission command is mutual trust among all commanders and leaders within an organization. This trust is developed, in large part, during training. Subordinate leaders demonstrate capability and proficiency to their commanders and, conversely, commanders demonstrate capability and competence to their subordinates.
The impetus for the physical application of mission command resides in shared understanding of a common purpose. Another term for “purpose” is “why.” “Knowing your why is not the only way to be successful, but it is the only way to maintain lasting success and have a greater blend of innovation and flexibility.”2 The purpose, or why, of an operation provides the guiding vision for an operation. The common purpose is generally disseminated in the form of the commander’s intent. By effectively communicating the why of an operation, commanders provide their subordinates the freedom to innovate and make bold decisions on the battlefield based on present battlefield conditions.
Commanders, leaders and Soldiers at all levels within 11th ACR developed mutual trust during the preceding months through many individual and collective training events. Individual and collective training facilitated the development of the Soldiers and leaders in their formations. Conversely, the training allowed senior leaders at all levels within the regiment to prove their competence and decision-making capabilities to their subordinates.
Moreover, the trust within the regiment directly affected how the regiment planned operations, delivered operations orders and fought on the battlefield. The squadron spent little time delivering a long, drawn-out operations order. Instead, troop commanders received a brief enemy situation update, a simple squadron mission statement and our respective tasks/purposes, followed by the squadron commander’s intent. The squadron commander ensured each of his troop commanders accurately understood the operation’s larger purpose and how each troop fit into that larger purpose. By understanding our purpose, troop commanders were better able to see the importance of their mission in relation to the squadron and the regiment.
In D Company, I provided my subordinates with a succinct order, a simple set of graphics and direct-fire-control measures. However, I focused my attention on ensuring my platoon leaders clearly understood the operation’s purpose. Our purpose was quite clear for the movement-to-contact – deny the enemy key terrain in the vicinity of the Racetrack to deny the enemy the ability to mass combat power against the regiment’s DO. To put it more simply, we were to disallow the enemy key terrain in and around the Racetrack because it would put the enemy in a favorable position on the battlefield.
By clearly articulating the operation’s purpose, I provided my subordinates with comprehensible guidance – this is what we must do and this is why we must do it. Clear guidance reduced ambiguity within the formation, allowing my platoon leaders and subordinate leaders freedom of action to fight the enemy as the mission and conditions on the ground dictated.
Also, clearly articulating the purpose provided me freedom on the battlefield by untying me from continually having to instruct my subordinates on what I wanted them to do. This allowed me to step back and continually assess and reassess the bigger picture. In seeing the bigger picture, I was able to reposition forces and assets much quicker than I would have been able to if I were focusing on the fight at the micro-level. In turn, I was able to operate within 2-69 AR’s decision cycle, allowing me to understand and act while they were still attempting to gain an understanding of what was unfolding on the battlefield.
Fundamentals, organizing for combat and troop formations
Understanding the fundamentals is a key component to successfully executing any Army operation. The fundamentals for a movement-to-contact are:
- Focus all efforts on finding the enemy;
- Make initial contact with the smallest force possible, consistent with protecting the force;
- Make initial contact with small, mobile, self-contained forces to avoid decisive engagement of the main body on ground the enemy has chosen;
- Task-organize the force and use movement formations to deploy and attack rapidly in any direction;
- Keep subordinate forces within supporting distance to facilitate a flexible response; and
- Maintain contact regardless of the CoA adopted once contact is gained.3
At the most elementary level, a key to a successful movement-to-contact starts with an effective organization for combat. A commander must begin by considering the factors of mission, enemy, terrain, troops available, time and civil considerations (METT-TC) when determining the most effective method of organizing a formation for combat. Concurrently, a commander must understand his own task-organization before he can allocate forces to meet mission requirements. This assists a commander in focusing all efforts on finding the enemy and making contact with the smallest possible force.
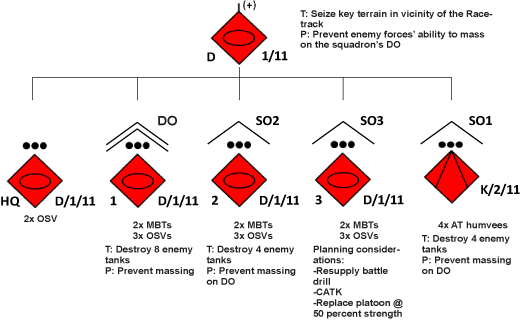
During the movement-to-contact, I had at my disposal three organic tank platoons and a platoon of anti-tank (AT) support from K Troop, 2/11 ACR. My tank platoons consisted of two opposing-force (OPFOR) main battle tanks (MBTs) and three OPFOR surrogate vehicles (OSVs). The AT platoon was a humvee-mounted, tube-launched, optically tracked, wire-guided and Improved Target Acquisition System-equipped force.
Based on previous experience working together, I knew the AT platoon had an excellent ability to conduct reconnaissance due to its mission as tank hunter/killers. I chose to use the lightly armored, but heavily fortified, AT platoon as the lead element in my formation. I wrestled with this decision for a considerable amount of time during my planning process. I was worried that leading with humvees would make the formation extremely vulnerable to becoming fixed upon initial contact with the enemy. I contemplated leading with tanks and having the AT platoon in a follow-and-support role, but I thought leading with MBTs or OSVs would make our formation easier to identify.
In the end, I chose to lead with the AT platoon because I felt the decision was more in line with the fundamentals of the movement-to-contact. Also, I felt that in pushing the AT platoon far forward of the company’s main body and allowing it to conduct reconnaissance pull would enable the company to move rapidly and attain better situational understanding than if I were to lead with my MBTs or OSVs. Furthermore, I assessed that the AT platoon’s low profile would limit the enemy’s ability to identify the lead element of my formation, thus giving us the advantage to see first, understand first, act first and finish decisively.4
I used a diamond formation, which isn’t a formation prescribed in Field Manual (FM) 3-90.1, Tank and Mechanized Infantry Company Team, but is similar to the company-team wedge formation. As already noted, I led with the AT platoon. The 1st Platoon (the DO) and 2nd Platoon (Shaping Operation 2) were about 500 meters behind the AT platoon serving as the main body, while 3rd Platoon was my trail platoon and moved 500 meters behind the main body. My headquarters element was a terrain feature behind the reserve.
The diamond formation and our task-organization allowed me to rapidly transition the AT platoon to a support-by-fire position and bring my main body forward to mass fires against the enemy. Also, the diamond formation provided depth and multiple angles to engage the enemy, forcing the enemy to focus their attention in multiple directions.
The point in discussing D Company’s task-organization and choice of formation isn’t to advocate for one approach over another. Rather, it is to point out that “more than one road leads to Rome.” Commanders must not be wed to one technique over another. Commanders must continually analyze the factors of METT-TC to best organize for combat. Sometimes this will call for an unconventional approach. The great thing about NTC is commanders can experiment and try different ideas and approaches. Commanders must not fear failure but rather seek to employ the techniques they feel best sets them up for achieving decisive victory in battle.
Resupply to stay in the fight
There is a common misconception across the Army about Blackhorse and logistics – many seem to think Blackhorse has an endless supply of ammunition and is immune to logistical concerns such as ammunition resupply. This is utterly false. Blackhorse must adhere to the same rules for ammunition resupply as the rotational unit.
Ammunition resupply was one of my major concerns as I conducted mission planning. During my planning process, my primary objective was to identify how to maintain the ability to fight continuously – to put it more plainly, I wanted no breaks for matters of logistics. The purpose behind this desire was, I felt, that continuous pressure on the enemy would allow the company to turn the enemy’s “time flank,” “to hit the enemy at those times he is not ready; either before he is prepared or after his strength has culminated.”5 Turning the time flank would not be possible if I had to slow or halt my attack to resupply my formation. To combat this, we implemented an ammunition resupply battle drill to allow us to maintain a sustained rate of massed direct fires while allowing us to pull platoons from the fight to resupply.
Our battle drill called for the trail platoon to move from its protected location to replace the platoon fighting on the line, allowing the platoon to retrograde, link up with the headquarters and conduct resupply operations. Upon completion of resupply, the platoon moved back to its forward position on the line, while the trail platoon moved back to reoccupied its position behind the main body.
We conducted this battle drill several times during the movement-to-contact, allowing us to maintain constant pressure on the enemy. In the end, effectively managing logistics while in the fight permitted the company to maintain pressure and tempo, allowing us to obtain the upper hand as the battle progressed.
Home-field advantage
Another key advantage D Company exploited was its knowledge of the terrain. Many units and Soldiers from across the Army rail against what they perceive as 11th ACR’s unfair advantage in always fighting in its own backyard. However, one must remember, “We almost certainly will fight enemies on their home turf. They’ll know the good hiding places, defilade positions and roadblocks. The OPFOR thus has a realistic advantage in its knowledge of the terrain.”6
This idea must not be lost on the operational force. As such, we will find ourselves on unfamiliar battlefields where the enemy has the upper hand in knowing and understanding the terrain and the local populace. This knowledge and understanding is not an unfair enemy advantage but rather a symptom of war. Moreover, it is something we must willfully accept and something for which we must plan.
In conclusion, the movement-to-contact between 11th ACR and 3/3 Infantry during NTC Rotation 12-05 provides many great learning points. We must remember that mission command enables victory by empowering subordinates and forces – that the power of mission command relies in mutual trust and shared understanding. Next, while we have many manuals that prescribe techniques, commanders must always be thinking and analyzing the situation. They must not fear trying something different to seek out success. And lastly, certain aspects of war will not change – during expeditionary operations, the enemy likely knows the area of operations better than the U.S. Army, and if we don’t adequately plan for logistics, logistics will sideline our operations. Commanders must think through these ideas during the planning process. The battlefield is unforgiving; as such, commanders must do everything they can to mitigate this prior to joining battle.
Notes
1Army Doctrinal Reference Publication 6-0, Mission Command, Washington, DC: Headquarters, Department of the Army, 2012.
2Sinek, Simon, Start With Why: How Great Leaders Inspire Everyone To Take Action, Penguin Group, 2009.
3FM 3-90-1, Offense and Defense Volume 1, Washington, DC: Headquarters Department of the Army, 2013.
4Rosenberger, John D., “Breaking the Saber: The Subtle Demise of Cavalry in the Future Force,” Association of the United States Army Landpower Essay Series No. 04-1, The Institute of Land Warfare, 2004.
5Leonhard, Robert, retired LTC, Fighting By Minutes: Time and the Art of War, Westport: Prager Publishers, 1994.
6Nagle, John, retired LTC, “Why the OPFOR Wins,” ARMOR, March-April 1995.
 email
email print
print